Week 20
This is the Morleyville Mission, built in 1875 on the Bow River in the foothills of the Canadian Rockies. At the time, plains indians were still hunting the buffalo and the first large cattle ranch wouldn't be established at Cochran near Calgary until 1881. The church was built by the Rev. George McDougall to serve the the native people and fur traders of the area. A town sprung up and at one time it was the largest in Southern Alberta. Today nothing remains but the mission.
Like a lot of people, old empty buildings attract me. This old church has seen sermons, celebrations, weddings, and funerals. It had deteriorated but was restored some time back and services are now held there twice a year. You can also rent it for a wedding other other gatherings.
The photograph was taken with a Nikon D3 and Nikkor 24-70mm 1:2.8G ED N lens. The sun is low this time of year and behind my left shoulder. The clouds were playing peekaboo with the light and I took this shot just as it played across the church and the hills.
The camera is in aperture priority mode at f/11 to give sufficient depth of field. ISO is 200, standard for the D3, which gave 1/400 second exposure per the cameras meter. It just so happens to match the sunny 16 rule too. Focal length is 48mm.
In Photoshop I cropped square and applied a bit of contrast and light sharpening - that was it.
Idea based on Vacant Possession, pages 152-155 in the book 50 Photo Projects, by Lee Frost
Saturday, October 31, 2009
Sunday, October 25, 2009
Bronica S2 Medium Format
Week 19
Square format cameras force you to see things differently than the 4x6 ratio that 35mm gives. And these days you can buy a nice square format camera pretty cheap. I like the old mechanical cameras and the Bronica S2 (see mine here) is a nice one with Nikon lenses and a cool retro look with a "Z" for Zorro on the waist level view finder.
When you look down in the view finder the first thing you notice is things are backwards and that is a problem when you are trying to follow things with the camera. You can buy an eye level viewer or a sports finder for them but for subjects that aren't moving it isn't a problem. A nice thing about medium format is that the negatives are LARGE and in a good lab with a good scan the results can be as good or better than a 35mm digital. Unfortunately most labs these days aren't that great and a good scan can be expensive.
The shot is of Pyramid Mountain in Jasper Park with Patricia Lake in the foreground. It is early morning with sun behind me and to my right. The camera is a Bronica S2 with a Nikkor-P 1:2.8 75mm lens. It is the equivalent of a normal lens on a 35mm camera. The film is Fuji 400 print film (120 roll). I used my D3 as a light meter and came up with an exposure of f/9 and 1/500 sec selected so I could hand hold since the Bronica has a fair amount of mirror slap by reputation. This was the first roll I ran through it and all shots turned out fine. To see a comparison with the Nikon D3 click here.
Which one is the D3? The D3 is the clear winner at full resolution but I suspect it was because my lab here in Calgary didn't do a particularly good job. I'll have to try a different lab. I've put them at the same resolution here and the D3 is the one on the right.
In Photoshop I removed some dust specs and streaks from the lab and a blue cast from the daylight balanced film. The D3 auto white balance had done a good job by comparison and the digital negative was cleaner. I liked the saturated colors and look of the Fuji film and straight from the camera found I liked it better than the D3 on some occasions (of course Photoshop can help there). All in all, much better results than what I normally achieve with 35mm film but still not up to the D3.
By the way, the chapter in the book is about using twin lens reflexes like the Mamiya C220. I have been trying to get a Yashica TLR for a reasonable cost but gave up when I found out I could get the Bronica for about the same amount. Some people prefer a TLR since there is no mirror slap. But I'm a Nikkor guy and the look of the Bronica is too cool....
Idea based on Two for One, pages 148-151 in the book 50 Photo Projects, by Lee Frost
Sunday, October 18, 2009
Faces (or Zombies on Stephen Avenue)
Week 18
See more zombies by clicking here, but be warned! Some are pretty gruesome.
The faces of people are endlessly interesting, but photographing strangers up close is difficult for me. It seems easier when I am in a foreign country and I am the stranger because afterall it is expected of a tourist, but it seems hard when at home. Fortunately zombies don't seem to mind if you photograph them. In fact, they seem to like it.
The Zombie Walk was yesterday here in Calgary. Most zombies go "into character" as soon as they see a camera pointed at them. I think a number of people thought I was with a newspaper or something. Those that I asked for a photo did so willingly. This was a fun day and I must have photographed a 100 zombies.
The Nikon D3 is perfect for doing this kind of photography. Focus is fast and I put it on continuous focus when the people started moving. I used an AFS Nikkor 24-70mm 1:2.8 G ED lens and zoomed to fit the situation.
Primary light was from an overcast sky with no direct sun for the most part. I used a SB800 flash in TTL mode attached to the shoe and dialed down by 0.7 to 1 full stop for fill on most shots. It puts a twinkle in the eye and takes the shadow off the face. It also falls off fast if you are near the person being photographed and by brightening them relative to the background makes them pop. It also freezes some movement. For most shots the camera was in aperture mode.
Almost all the photos were processed the same way. I was shooting raw photos and the first thing I did in Raw was to make sure there were no blown out areas then moved the slider to around 15 for both clarity and vibrance. After opening in Photoshop I removed distractions in a few cases and put at least linear contrast on every photo in Curves. I put a heavy vignette on most of them.
Idea based on Face Value, pages 36 and 37 in the book 50 Photo Projects, by Lee Frost
Tuesday, October 13, 2009
In the Red
Week 17
Infrared in black and white makes the sky very dramatic. Rather than shoot infrared film or convert a digital camera I have used an infrared conversion filter in Photoshop here.
My Nikon D3 is in program mode at f/8 and 1/250 sec, ISO 200. The lens is an AFS Nikkor 24-70mm 1:2.8 G ED with the focal length at 24mm. The light is early morning and behind my right shoulder.
This is really about post processing. The original color version is here. To make the conversion I began with a black and white adjustment layer and used the pull down tab with infrared as a start before tweaking the sliders. In this case I moved the blue slider a bit to darken sky and water. I also put a bit of diffuse glow on it - not too much or it blows out the snow on the mountain.
Idea based on Red Alert, pages 94 and 95 in the book 50 Photo Projects, by Lee Frost
Sunday, October 4, 2009
Isolation
Week 16
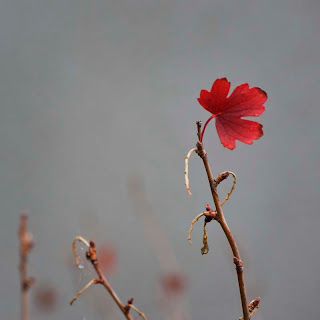
The subject is isolated here to draw attention to it. Sometimes what you leave out is as important as what stays in. This technique is frequently used in portraiture and there are several approaches you can use or combine:
1) use a longer lens,
2) control (open) the aperture,
3) simplify the background,
4) and get closer to the subject and further from the background.
I've used all four techniques here. It was wet, snowy, and windy this morning and generally not nice weather so I wasn't planning on going too far from the apartment. I was watching the snow from the patio when I notice how pathetic the berry bushes were. When the snow stopped I thought I would try to make a photo of one of the leaves on a bush and after 130 tries this is what I got. I tried different apertures, frames, natural light, a soft box, rimlight and various combinations.
The camera is in aperture priority at f/8 to get the depth of field I wanted - the lens is capable of f/2.8 but I am very close here. In fact, the leaf is not in sharp focus from front to back but I thought it was a good compromise. The lens is a AF-S Micro Nikkor 105mm 1:2.8 G ED VR on the Nikon D3 and I am maybe 50 to 60 cm or so from the leaf. The stucco wall of the apartment is about 1 m behind the leaf. I couldn't get the camera where I wanted it on the tripod, and the wind was blowing the leaf, so I hand held and put the sensor speed at ISO 800 to get a faster shutter. It ended up being at 1/250 second.
Natural light is from the right but is extremely diffuse from the clouds and light snow flurries. To pump up the shot I had a speedlight (SB-600) being controlled from a SB-800 on the camera from behind giving rimlight and putting a glow on the leaf. There is also a small LiteDome XS softbox with another SB-600 (you have to get all your equipment out every once in a while) dialed way down on the left just outside the frame.
Post was more than I normally do... In addition to isolating the leaf and darkening the background I added saturation and contrast to the leaf along with final sharpening.
I like this although it is not one of my better pictures. It tells a story though - it is the last leaf standing when the snow starts to fall. The berries are shriveled and the other leaves have fallen. Soon, it is going to be cold, cold, cold. I use this separation technique fairly often. For example, here is a fern frond in Australia where the background softened.
Idea based on In Isolation, pages 48 and 49 in the book 50 Photo Projects, by Lee Frost
Subscribe to:
Posts (Atom)