Tuesday, December 29, 2009

Tower Project

Week 27

This week I'm starting a project that shows the Calgary Tower from different angles, locations, lenses, times of the day and year, etc.

To see the rest (at least as it exists today) click here.

I did a series with the Seattle Space Needle but this idea is to return time after time...

Idea taken from Long-Term Project, pages 70-71 in the book 50 Photo Projects by Lee Frost.

Sunday, December 13, 2009

Christmas Theme

Week 26

It is really cold right now in Calgary, around -25 degrees C and although I have gotten out to photograph a bit it is a lot more pleasant inside. When it gets cold, rainy, or miserably hot then one way to exercise your photographic eye is indoors, in the house, and that is what I chose to do this week. And since it is getting close to Christmas, I had an array of seasonal things to chose from.

Now the thing about photographing reflective round things is that they are prone to hot spots and of course they reflect things you may not want in the picture. One solution is even lighting all around, another is to carefully place things to minimize reflection or at least have it where you want it. I chose even lighting.

I put down a sheet of white card to act as a seamless background and then moved my softbox right on top of it and surrounded it with styrofoam. My softbox is a medium sized Photoflex LiteDome and I used a Nikon SB-600 flash. The SB-600 can drive a medium softbox if the subject is moderately close. I stuck one more SB-600 inside this contraption and bounced it off the front styrofoam. The SB-800 on my camera was used solely as a master for the two SB-600s. Both SB-600s were in i-TTL mode with no further adjustment to flash.

The camera is a D3 set as follows ISO 200, aperture priority f/16, and shutter speed 1/30 second (why wasn't it at 1/200? because I forgot). I was at f/16 to increase the depth of field. I probably should have put it in manual mode to get more even exposure. Exposure compensation was set at +1 stop on camera to lighten up the background a bit. Then lens is a Nikon AF-S Micro Nikkor 105mm1:2.8G ED so I can get close.

Post processing was minimal. I cropped all of the photos square to the same size and moved them on to a background layer. Once on the background, I arranged them to taste, and using curves adjusted backgrounds until they were all about the same. Then I flattened and removed sensor spots on the background (I need to clean that sensor). The background looked too dark, so I lightened the exposure overall with an exposure adjustment layer until it was a bit brighter and that was it.

Idea based on Household Chores, pages 46-47 in the book 50 Photo Projects by Lee Frost.

Sunday, December 6, 2009

Fake HDR (High Dynamic Range)

Week 25

OK, I'm halfway through this exercise now with only 25 weeks more to go!

This week I'm (kind of) blogging about getting additional dynamic range out of a camera using HDR - High Dynamic Range - which are digital methods of combining one or more photographs with different exposures. Well, actually I cheated and only used one exposure but more about that later.

Why would you want to do HDR? The potential need arises when there are high contrast scenes with very bright areas as well as dark areas with important details. The human eye can handle this pretty well but a camera only has so much range. HDR manages the trick by taking exposures for dark, bright, and in-between areas as needed then blending them.

There is software, with Photomatrix being a popular one, that will do the work for you and allow easy adjustment. It can also be done in Photoshop although I've not had great luck there. There is an example here of a photograph I took in Australia and applied HDR to in Photoshop. It isn't that great, the area around the sun is burned out even with HDR. Like I said, I haven't had great luck with it. I've also done it manually where I superimposed two exposures and blocked out the over or underexposed portion with a mask.

Here are some other considerations for HDR:
  1. It isn't reproducing what the eye sees - it is squashing exposures into a narrower range

  2. It can give some wild colors and not look very realistic

  3. It doesn't work too well if things are moving between exposures

But it can give some really neat effects when not overdone, although it isn't for everyone. Another way to handle high range is with a graduated filter, at least with some scenes where the sky tends to overexposure.

I personaly like the look when blended back. In fact, it is possible to get something of the look without using HDR and that is what I did on this week's picture. Click on it to enlarge and see what is going on. There is a lot of detail under the bridge for example that wouldn't normally be there and the clouds reflected in the glass of the building really pop. I've left some of the wild color as well as gritty detail that can occur when you use this method.

The tool I am using is a Photoshop plug-in called Topaz Adjust 3. It gives a range of effects with this being one of the cooler one. After adjusting the photo for keystoning (it is wide angle) I cropped and then applied the Topaz Adjust 3 "Psychedelic" filter, dialed back the layer, gave it a vignette, and sharpened. That was all.... The original photograph without adjustment is here.

The camera is a Nikon D3 set at ISO-200 with an exposure time of 1/250 of a second and a Nikkor AFS 14-24mm 1:2.8G ED mounted wide at 14mm with an aperture of f/8.

Idea based on Extend Your Range, pages 32-35 in the book 50 Photo Projects by Lee Frost.

Sunday, November 29, 2009

Sunset over the Bow

Week 24

The sunset was really pretty this evening, and actually the sunrise was as well. This shot was taken from our balcony and I've tried it many times before and have always struggled to get the shot. I have Cokin graduated filters but to be honest I don't really like using them.

Everybody likes sunsets - I just wish they were easier to photograph. I actually do better either just after sunset like this shot in Brisbane towards Story Bridge off Kangaroo Point, or this blog posting about Modern Architecture. I really like late afternoon directional light too, but usually I'm shooting away from the sun or at least at an angle like here (also taken in Brisbane with Kangaroo Point in view).

The camera is my D3 mounted on a tripod in aperture priority at f/5.6. The camera is set to give a minimum shutter speed of 1/30 second and determined on it's own that ISO should be 250. I bracketed this shot but I used the one with no offset. The lens is a AF-S Nikkor 24-70mm 1:2.8G ED zoomed to 38mm.

I pulled this up as a raw file and fooled with it a while - in the end I just took the jpg straight from the camera and posted it with a bit of straightening and cropping (you shouldn't have to straighten if you use a tripod :-). The camera was set in my custom "vivid" mode which adds some saturation to the jpg files. The main decision for me here was whether I wanted more detail in the shadow area - I decided not to and it is almost a silhouette. To get more detail I would have used the overexposed shot in a layer or HDR. I don't think the graduated filter would give me what I was looking for.

Idea based on Last Light, pages 62-64 in the book 50 Photo Projects by Lee Frost.

Monday, November 23, 2009

Stormy Day

Week 23

We were in Seattle this last weekend and it rained every day except the last afternoon when the sun broke through as we were heading back to Seattle on the ferry. It is a busy photograph but it has a lot of interesting things about Seattle in it - the needle, a seaplane, the wharfs, and skyline.

The lens is a AF-S Nikkor 70-300mm 1:4.5-5.6G VR that was hand held. The vibration reduction (gotta love it) was in active mode since I was on a moving boat. The camera is a D3 at ISO 200, focal length of 125mm, aperture of f/9, and shutter speed at 1/320 to keep things sharp.

Light has broken through the cloud and is behind me and low in the afternoon sky.

Idea based on Storm Chaser, pages 124-127 in the book 50 Photo Projects by Lee Frost.

Monday, November 16, 2009

Pinhole Silliness

Week 22

This really is silliness. The subject is an earthenware vessel I bought in Papua New Guinea and I've photographed it with two very different lenses. The version on the left was made with an AF-S Nikkor 24-70mm 1:2.8G ED and the version on the right from a plastic cup bottom with a pinhole punched in it (with of all things a pin).

I made the lens from a Nikon PK-13 extension ring that mates the plastic cup to the camera. The silliness is because I've attached a piece of plastic with a hole in it to one of the better cameras on the market today. I couldn't stand the thought of buying a decent pinhole camera and I didn't have my tools available to build a better one myself. An interesting thing about pinhole cameras is that they hold focus from front to back but aren't very sharp, especially if enlarged. People do use them for artistic purposes, and Lee Frost has some in his book I like. But they really aren't my cup of tea which is why I haven't gone any further than a plastic cup.

The subject is lit the same for both pictures. It is on a curved piece of poster paper to give a smooth background and surrounded with styroform slabs to reflect the light evenly from a single daylight balanced fluorescent bulb.

The photo has a blue cast to it because the cup bottom was blue and some of that light has seeped in. The exposure was in manual mode at 1.3 seconds with ISO set at 200. By back calculating from the other exposure I guesstimate the aperture of the pinhole is f/500 or so. The focal length might be around 35mm or so, just guessing. My hypothesis is that there is an optimal aperture, which would be an interesting experiment. I also think a pinhole with a sharp edge and no burr would make a better picture.

To make it a somewhat better shot I increased contrast in Photoshop by moving the sliders in on Levels. There is no post to the picture shot with the Nikkor lens other than some sharpening after I downsized.

I probably could have found a better subject too but I ran out of time this week. Anyway, after this experiment I am ready to go back to my better lenses....

Idea based on Pin Sharp, pages 88 to 91, in the book 50 Photo Projects, by Lee Frost.

Monday, November 9, 2009

Modern Architecture

Week 21

I took this photograph on the way home this evening. With a few exceptions, when I photograph architecture it is historic or classical in nature. Among the exceptions are the Sydney Opera House .

Actually, I've photographed this location on Stephen Avenue in Calgary before and posted it here on my other blog. Modern architecture, like all architecture, is art in it's own right. Curves and free flowing shapes seem to be in vogue now. I think they tend to photograph well at night.

This shot was made with a Nikon D3 and AF-S Nikkor 14-24mm 1:2.8G ED lens. The camera was in aperture priority mode at f/3.5 and the ISO fixed at 800. The D3 has very little noise at ISO 800. I probably could have opened the lens all the way up to 2.8 but there was enough light to stop it down a little. It was right after the sun set but there was enough light in the sky to make it electric blue. I bracketed the exposure plus and minus one stop off of what the meter indicated. The one that I selected was right where the camera thought would be best at 1/20 second. Focal length is 15mm to capture everything and focus is on the giant Christmas decoration. I braced on a barricade to keep the camera steady as I didn't have a tripod with me.

In post I cropped to 8x10 and used the lab mode to increase contrast and saturation.

Idea based on Architecture with Attitude, pages 10-13, in the book 50 Photo Projects, by Lee Frost.

Saturday, October 31, 2009

Vacant Church

Week 20

This is the Morleyville Mission, built in 1875 on the Bow River in the foothills of the Canadian Rockies. At the time, plains indians were still hunting the buffalo and the first large cattle ranch wouldn't be established at Cochran near Calgary until 1881. The church was built by the Rev. George McDougall to serve the the native people and fur traders of the area. A town sprung up and at one time it was the largest in Southern Alberta. Today nothing remains but the mission.

Like a lot of people, old empty buildings attract me. This old church has seen sermons, celebrations, weddings, and funerals. It had deteriorated but was restored some time back and services are now held there twice a year. You can also rent it for a wedding other other gatherings.

The photograph was taken with a Nikon D3 and Nikkor 24-70mm 1:2.8G ED N lens. The sun is low this time of year and behind my left shoulder. The clouds were playing peekaboo with the light and I took this shot just as it played across the church and the hills.

The camera is in aperture priority mode at f/11 to give sufficient depth of field. ISO is 200, standard for the D3, which gave 1/400 second exposure per the cameras meter. It just so happens to match the sunny 16 rule too. Focal length is 48mm.

In Photoshop I cropped square and applied a bit of contrast and light sharpening - that was it.

Idea based on Vacant Possession, pages 152-155 in the book 50 Photo Projects, by Lee Frost

Sunday, October 25, 2009

Bronica S2 Medium Format

Week 19

Square format cameras force you to see things differently than the 4x6 ratio that 35mm gives. And these days you can buy a nice square format camera pretty cheap. I like the old mechanical cameras and the Bronica S2 (see mine here) is a nice one with Nikon lenses and a cool retro look with a "Z" for Zorro on the waist level view finder.

When you look down in the view finder the first thing you notice is things are backwards and that is a problem when you are trying to follow things with the camera. You can buy an eye level viewer or a sports finder for them but for subjects that aren't moving it isn't a problem. A nice thing about medium format is that the negatives are LARGE and in a good lab with a good scan the results can be as good or better than a 35mm digital. Unfortunately most labs these days aren't that great and a good scan can be expensive.

The shot is of Pyramid Mountain in Jasper Park with Patricia Lake in the foreground. It is early morning with sun behind me and to my right. The camera is a Bronica S2 with a Nikkor-P 1:2.8 75mm lens. It is the equivalent of a normal lens on a 35mm camera. The film is Fuji 400 print film (120 roll). I used my D3 as a light meter and came up with an exposure of f/9 and 1/500 sec selected so I could hand hold since the Bronica has a fair amount of mirror slap by reputation. This was the first roll I ran through it and all shots turned out fine. To see a comparison with the Nikon D3 click here.

Which one is the D3? The D3 is the clear winner at full resolution but I suspect it was because my lab here in Calgary didn't do a particularly good job. I'll have to try a different lab. I've put them at the same resolution here and the D3 is the one on the right.

In Photoshop I removed some dust specs and streaks from the lab and a blue cast from the daylight balanced film. The D3 auto white balance had done a good job by comparison and the digital negative was cleaner. I liked the saturated colors and look of the Fuji film and straight from the camera found I liked it better than the D3 on some occasions (of course Photoshop can help there). All in all, much better results than what I normally achieve with 35mm film but still not up to the D3.

By the way, the chapter in the book is about using twin lens reflexes like the Mamiya C220. I have been trying to get a Yashica TLR for a reasonable cost but gave up when I found out I could get the Bronica for about the same amount. Some people prefer a TLR since there is no mirror slap. But I'm a Nikkor guy and the look of the Bronica is too cool....

Idea based on Two for One, pages 148-151 in the book 50 Photo Projects, by Lee Frost

Sunday, October 18, 2009

Faces (or Zombies on Stephen Avenue)

Week 18

See more zombies by clicking here, but be warned! Some are pretty gruesome.

The faces of people are endlessly interesting, but photographing strangers up close is difficult for me. It seems easier when I am in a foreign country and I am the stranger because afterall it is expected of a tourist, but it seems hard when at home. Fortunately zombies don't seem to mind if you photograph them. In fact, they seem to like it.

The Zombie Walk was yesterday here in Calgary. Most zombies go "into character" as soon as they see a camera pointed at them. I think a number of people thought I was with a newspaper or something. Those that I asked for a photo did so willingly. This was a fun day and I must have photographed a 100 zombies.

The Nikon D3 is perfect for doing this kind of photography. Focus is fast and I put it on continuous focus when the people started moving. I used an AFS Nikkor 24-70mm 1:2.8 G ED lens and zoomed to fit the situation.

Primary light was from an overcast sky with no direct sun for the most part. I used a SB800 flash in TTL mode attached to the shoe and dialed down by 0.7 to 1 full stop for fill on most shots. It puts a twinkle in the eye and takes the shadow off the face. It also falls off fast if you are near the person being photographed and by brightening them relative to the background makes them pop. It also freezes some movement. For most shots the camera was in aperture mode.

Almost all the photos were processed the same way. I was shooting raw photos and the first thing I did in Raw was to make sure there were no blown out areas then moved the slider to around 15 for both clarity and vibrance. After opening in Photoshop I removed distractions in a few cases and put at least linear contrast on every photo in Curves. I put a heavy vignette on most of them.

Idea based on Face Value, pages 36 and 37 in the book 50 Photo Projects, by Lee Frost

Tuesday, October 13, 2009

In the Red

Week 17

Infrared in black and white makes the sky very dramatic. Rather than shoot infrared film or convert a digital camera I have used an infrared conversion filter in Photoshop here.

My Nikon D3 is in program mode at f/8 and 1/250 sec, ISO 200. The lens is an AFS Nikkor 24-70mm 1:2.8 G ED with the focal length at 24mm. The light is early morning and behind my right shoulder.

This is really about post processing. The original color version is here. To make the conversion I began with a black and white adjustment layer and used the pull down tab with infrared as a start before tweaking the sliders. In this case I moved the blue slider a bit to darken sky and water. I also put a bit of diffuse glow on it - not too much or it blows out the snow on the mountain.

Idea based on Red Alert, pages 94 and 95 in the book 50 Photo Projects, by Lee Frost

Sunday, October 4, 2009

Isolation

Week 16

The subject is isolated here to draw attention to it. Sometimes what you leave out is as important as what stays in. This technique is frequently used in portraiture and there are several approaches you can use or combine:


1) use a longer lens,
2) control (open) the aperture,
3) simplify the background,
4) and get closer to the subject and further from the background.


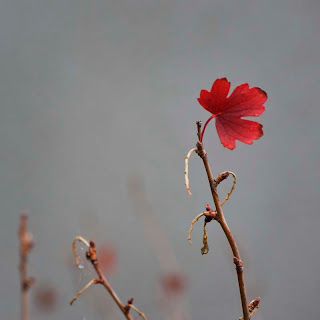
I've used all four techniques here. It was wet, snowy, and windy this morning and generally not nice weather so I wasn't planning on going too far from the apartment. I was watching the snow from the patio when I notice how pathetic the berry bushes were. When the snow stopped I thought I would try to make a photo of one of the leaves on a bush and after 130 tries this is what I got. I tried different apertures, frames, natural light, a soft box, rimlight and various combinations.


The camera is in aperture priority at f/8 to get the depth of field I wanted - the lens is capable of f/2.8 but I am very close here. In fact, the leaf is not in sharp focus from front to back but I thought it was a good compromise. The lens is a AF-S Micro Nikkor 105mm 1:2.8 G ED VR on the Nikon D3 and I am maybe 50 to 60 cm or so from the leaf. The stucco wall of the apartment is about 1 m behind the leaf. I couldn't get the camera where I wanted it on the tripod, and the wind was blowing the leaf, so I hand held and put the sensor speed at ISO 800 to get a faster shutter. It ended up being at 1/250 second.


Natural light is from the right but is extremely diffuse from the clouds and light snow flurries. To pump up the shot I had a speedlight (SB-600) being controlled from a SB-800 on the camera from behind giving rimlight and putting a glow on the leaf. There is also a small LiteDome XS softbox with another SB-600 (you have to get all your equipment out every once in a while) dialed way down on the left just outside the frame.


Post was more than I normally do... In addition to isolating the leaf and darkening the background I added saturation and contrast to the leaf along with final sharpening.


I like this although it is not one of my better pictures. It tells a story though - it is the last leaf standing when the snow starts to fall. The berries are shriveled and the other leaves have fallen. Soon, it is going to be cold, cold, cold. I use this separation technique fairly often. For example, here is a fern frond in Australia where the background softened.

Idea based on In Isolation, pages 48 and 49 in the book 50 Photo Projects, by Lee Frost

Sunday, September 27, 2009

Something Different

Week 15

This week is about getting away from it all but instead of travel to an exotic country we went to a wildlife festival in Waterton Park in Southern Alberta.

The wildlife festival had multiple speakers and fieldtrips and there was a two hour photo course on wildlife that we went on where I took this picture. I photographed a number of animals in Waterton, but this black bear was the best shot. Some of my most favorite photographs are of birds and wildlife so I enjoyed getting this one.

When we first saw the bear, he was maybe 100 meters away and pretty small in my 70-300 zoom at 300mm focal length. The pro had a 600mm Nikkor AF-S 1:4 with a 1.4 extender and I tried that with better results. He recommended aperture priority at f/8 to make sure the face was well focused front to back with the long lens and that is where I had it. Unfortunately, the bear was in grass and shrubs so they weren't great shots. I took my camera off the 600mm so someone else could try it and put the 70-300 zoom back on the D3.

In a minute or two he started to amble down the hill and to the left. He disappeared into a gully and then came out. Just before he climbed down to the road I made this shot. Light is from fairly low morning sun to the right. I took a string of shots at 3 frames a second while he was turning his head and caught the face lit nicely.

The camera is a Nikon D3, ISO 200, set in aperture priority and still at f/8 from the long lens. The lens is a AF-S Nikkor 70-300mm 1:4.5-5.6 G ED VR. The resultant shutter speed is 1/200 second which is probably a bit slow. The D3 lets you set a minimum shutter speed (it varies ISO in the case of fixed aperture if shutter speed drops too far) and I'll set that in future at 1/300 second probably. The bear is maybe 30 meters from me and moving away and to the left. I had the presence of mind to frame him pretty well at least.

The post was to tweak curves for contrast and I also put a vignette around it. I cloned out some small rocks in the lower right. I could have left them in or cropped them but found them distracting and liked the original composition. I did crop it to 8x10 starting in the far lower right up to the top of the frame.

Idea based on Take a Break , pages 132-133 in the book 50 Photo Projects, by Lee Frost

Sunday, September 20, 2009

Peace Festival

Week 14

This week is about festivals but I've strayed from the book quite a bit. The chapter in the book is about going to Venice to photograph the Carnival. I don't think I'm going to get to Carnival this year, but it just so happens they were having the Calgary Community Peace Pole Unveiling Celebration this morning so I went there instead.

The Venice Carnival is brimming with people that are in costume and photogenic. The Calgary Celebration is a little lower key but I did photograph this lady. She goes by the name Shanti Amani Salaama, the Peace Fairy, at least for this festival. Festivals are a great place to photograph people though. You see a lot of real characters and they actually like to be photographed :-). Other good spots are Renaissance Festivals, Battle Reenactments, other Mardi Gras celebrations, you get the picture...

Light is from late bright afternoon sun over my right shoulder. You can see the hard shadow on her face. I was using a Nikon D3, ISO 200, at 1/2000 second in aperture priority. The lens is a AF Nikkor 300mm 1:4 at f/4 to minimize depth of field since the background wasn't too appealing. I've been working on reduced depth of field this week and here is another example with two blackbirds.

Post processing was minimal - basically a crop and slight contrast increase.

Idea based on Festival Spirit, pages 38-39 in the book 50 Photo Projects, by Lee Frost

Sunday, September 13, 2009

Reflections

Week 13

I do reflections from time to time, but usually end up not caring too much for them - for one thing mine often seem too symmetric. Sometimes they seem best blurry - see for example this picture of Story Bridge. But today I was trying for a sharp reflection and something more offbeat.

The location is Kananaskis Upper Lake and the light is afternoon sun from the left. The lake has a lot of dead stumps along the shore and that was to be the main subject. Of course there is a lot more in the frame, maybe too much. But somehow it comes together for me. There is fair balance for one thing. I really like the roots on the tree, they look like an octopus' arms. I thought it might be good in square format and framed it with that in mind when I shot.

The camera is my D3 and was in aperture priority at f/22 - I might have set it a little more open but I wanted good focus from front to back. A lot of people worry about diffraction at small apertures but I don't for small pictures and the interntet. Probably should have set it at f/16 and taken a little more care anyway :-). The lens is a Nikkor 24-70 f/2.8 at 24mm. I took a couple of frames but thought this one worked best for a reflection. It is set at ISO 400 so I can hand hold at 1/80 sec. Probably should have had a tripod too :-).

Post processing consisted of the square crop and going into lab mode with soft light to get a bit more contrast and punchier color. I dialed lab color back to 50% to tone it down it a bit.

Idea based on On Reflection, pages 82-83 in the book 50 Photo Projects, by Lee Frost

Monday, September 7, 2009

The Normal Lens

Week 12

The 50mm prime lens, also known as a standard lens or normal lens, came on a lot of 35mm cameras and was mounted on the first Leica that made 35mm popular.

I have several 50mm lenses for my Nikons, both manual and auto focus. They are nice because they are small, have low distortion, usually are very sharp, and are fast - down to f/1.4 or even f/1.2. Even the slowest ones are faster than the amateur zooms that come on most cameras today. Here is a shot taken at night in very low light with Nikon's cheapest current lens - a 50mm f/1.8 autofocus. I had to pan to keep the boat sharp but it shows what is possible.

Why is a 50mm lens considered normal? Actually there is a range that fits in this category and it varies according to film or sensor size. Typically normal perspective as perceived by humans is taken to be equal to the diagonal distance of the frame. For a 35mm frame the actual dimensions are 24mm x 36mm so the diagonal is 43.2mm if I have done my math right. That means a 50mm is actually a slight telephoto in the 35mm format.

Older rangefinders often came with a lens around 42mm to 45mm in focal length, including the camera I used to take this picture - a Kodak Signet 35 from the early 1950's. This is closer to an ideal normal perspective, at least according to the mathematical definition I've used above.

Back to the photograph. It was taken in a hotel room as we were waiting to move into our apartment. I took it because of the quality of the filtered light coming through a large window on the left side of the frame and it gave me a chance to test the lens wide open (in this case only f/3.5). I thought it would probably be a bit dreamy and not too sharp given the age of the lens but actually it is pretty sharp. Film is modern Kodak 200 bought in a drug store.

It is a bit overexposed and not on purpose. I determined exposure by taking a snap with my Nikon D3 which came up with f/3.5 and 1/15 at ISO 200. The Signet 35 doesn't have 1/15 but there is a 1/25 shutter speed so that is where it was set for this hand held picture. So why is a faster shutter speed overexposed? Probably because the shutter needs adjusting after all these years.

There is very little post processing in the picture. I straightened it a bit and took some shine out of the framed picture on the wall using the cloning tool. I like the way the out of focus areas look but can't tell how much of that comes from the film, the camera and lens, or the relatively low resolution scan. The D3 is quite a bit sharper and of course exposure is "better" but I like the Signet 35 look.

Idea based on Standard Bearer, pages 120-121 in the book 50 Photo Projects, by Lee Frost

Sunday, August 30, 2009

Fits in a Pocket

Week 11

I enjoyed doing this one - looks like an old photograph doesn't it? This Chevy was stopped in the middle of the road on Stephens Avenue in Calgary just down from where we were about to go in and eat. I didn't know why he was stopped where he was but I liked the head on view so I walked down to where he was, stepped out in the road, and quickly composed and shot the picture.

But I am getting ahead of myself. The idea here is to try a digital point and shoot instead of your fancy SLR. I used a digital point and shoot for years before I got my first digital SLR and used to carry mine everywhere I went - that is the beauty of them. They are handy and they aren't near as conspicuous as a Nikon D3....

Of course the downsides are that they have shutter lag, don't do as well in low light (look at the noise in this photo), you can't swap lenses, most of them don't have as much artistic control, overall quality is lower at high enlargement, etc. Oh yeah though, I left out an important plus, they are way cheaper. Overall, in good light with subjects that aren't moving too much they do just fine and they also can be enlarged up to 5x7 and even 8x10 for prints.

Now, back to the picture. This guy wasn't moving because his car was broke down. I only figured that out because a wrecker pulled up and hauled him away. Nice car though....

The camera is a Canon IXY Digital 70 and it is a couple of years old now. I have owned a couple of Canon IXYs and they were all good - just don't drop them, especially with the lens extended. The camera was set on automatic and I don't know what the ISO speed or 35mm lens equivalent is. I know I composed by zooming in somewhat.

The light is late afternoon coming over my shoulder straight at the car and there are some fairly strong reflections as a result. The EXIF data says the camera chose f/4.9 and 1/125 of a second. The hood of the car is sharp, the background soft and grainy from the relatively low light. I like the composition and didn't crop it at all.

Post processing consisted of increasing contrast and applying a B&W adjustment layer in Photoshop with the infrared option selected. I usually use the B&W layer these day for B&W instead of other techniques and try the different filter options in it to get ideas before tweaking further. In this case, the infrared really darkens the car because it was cherry apple red to begin with (click here for the original photograph without any post). I put some vignette around it and that was that.

Idea based on Pocket Power, pages 86-87 in the book 50 Photo Projects, by Lee Frost

Sunday, August 23, 2009

At a Loss for Inspiration

Week 10

This was a good week for quantity of photos posted in my travel blog but it was a struggle for One Photo a Week. But I ended up with this one that is interesting...

What do you do when the location is boring, the light is bad, it is raining, or all of the above. The things I tried weren't working but I spotted this bark and liked it. So I got close and blocked everything else out. Other things I try when the muse fails me include shooting in B&W (one of my favorites) and just looking harder and from different angles. When all else fails, go somewhere else :-).

The shot is of the bark of a tree located near the Bow River and I am around 2 feet (.6 M) away with nothing but bark in the frame. The light is late afternoon sun, the camera my D3 at ISO 200. The lens is a Nikkor 24-70 f2.8 at 70mm. The camera was in automatic mode and it selected an aperture of f7.1 and speed of 1/200 second.

There is very little post-processing in this picture other than cropping it square. I considered cloning out the partial splits at the edges of the frame but in the end just left them in.

Idea based on Desparate Measures, pages 30-31 in the book 50 Photo Projects, by Lee Frost

Monday, August 17, 2009

Panorama

Week 9

Panoramas are a great way to show wide horizontal scenes in my opinion and they sometimes work good on a vertical. Photoshop or similar software can be used to stitch together a series of pictures and I've used that technique successfully a number of times.

The advantage of that approach is you get great resolution and you don't need an ultra wide lens. The disadvantage is that if things are moving fast it might show, especially in the stitching. I always photograph in Manual with fixed iso, fixed speed, fixed focus, and fixed aperture so that the blending is smoother when I use this technique. It also helps to put your camera on a tripod but I've done OK handheld.

My D3 can make reasonable 20 to 30 inch wide frames though if you don't stand too close without stitching and that is what I've done here. The scene is an old grain silo in the Badlands east of Calgary near the town of Drumheller. I'll post some more pictures of the area in my other blog, Apparently Random Travel Blog. Anyway, when I took the shot I thought it might make a good panorama.

The lighting is coming from the late afternoon sun on the left. The cliffs in the background were dark from shadow so I lightened them up a bit in Photoshop. I bumped up contrast on the grain silo to show the texture and writing on the side better. I also put a slight vignette around the edges to draw the eye to the center.

The camera is a Nikon D3 at ISO 200 and 1/400 sec, lens is a Nikkor 24-70 f2.8 (my new present to myself) at f10 and 24mm.

Idea based on Stretch Your Imagination, pages 128-131 in the book 50 Photo Projects, by Lee Frost

Sunday, August 9, 2009

H20

Week 8

This week is about water. I've pointed my camera at it lot of times - rivers, boats, waterfalls, reflections, rain.... But there had to be a way to photograph water in a way I hadn't tried before.

This is a rock in the Bow River downstream of the spillway on the lagoon that forms Prince Island in the Eau Claire district in Calgary. I am standing above the rock on other rocks shooting more or less straight down from 2 feet or so as the water rushes by. Click on it and have a closer look at the strings of light in the water. I'm not sure what caused that but for me it is the best part of the picture and although this one doesn't grab attention right away I like the abstract quality.

I wanted to smooth out the water with a slow shutter speed. I didn't have a polarizer or neutral density filter so I just set the aperture as small as I could and the ISO as slow as I could. The camera is a D3 at ISO 100 (L1.0) and the lens is a Nikkor 50mm f1.8 set at f22. Exposure time was 1/10 of a second. Post processing in Photoshop consisted of darkening and increasing the contrast with curves.

Idea based on Just Add Water, pages 56-59 in the book 50 Photo Projects, by Lee Frost

Saturday, August 1, 2009

Agfa Optima Societe

Week 7

This is what passes for a sidewalk cafe in Kingwood, Texas. Actually, it is a nice place and I like the breakfast and coffee. I just don't care much for 38 degrees C Texas heat. The view of Kingwood Drive and the parking lot isn't that great either but c'est la vie. Anyway, this table and chair outside caught my eye and I kind of liked the lines and shapes.

The Lomo LC-A is a somewhat low tech Russian camera with a sharp lens but no real creative control settings other than zone focus. Exposure is set automatically. A society, called the Lomograph Society, was formed to take advantage of this freedom in a creative way (and maybe make a buck). They market a new version of the Lomo and some other inexpensive cameras including the Holga.

Well, I am a radical and I refuse to participate in this mainstream "art" of the masses. I am forming my own society and calling it a societe because it sounds more high brow. The societe is based on the original 35mm point and shoot camera with automatic exposure control, the German made Agfa Optima. As best I can tell the model Ia that I have came out about 1962.

What would you expect to pay for this camera? I paid $6.01 in an Ebay auction plus $5.50 for shipping. It still looks good after all these years, including the leather case, and everything works except the leaf shutter sticks open from time to time, and that is not a good thing. I made it through this roll without a mishap though. It has a self timer, fixed aperture at 1/30 shutter for flash, and Bulb. I even tried it with my Nikon SB-800 speedlight setting flash duration in the hot shoe and that worked. There is a picture of me stylin' with this camera here.

The picture was taken outdoors in early morning with Kodak Gold 200 film in automatic mode. The zone exposure was set at "two heads" on the dial or 2 meters. I have no idea what the exposure was since it was in automatic and doesn't show any information other than a red dot that turns green as you depress the "magic release lever" and hold it for "approximately 1 second" thereby letting you know it has enough light. Actually, it has surprised me with how well it works. For this shot I cropped in Photoshop, turned it B&W with a blue filter if I remember correctly in a layer, and upped the contrast with Curves.

Idea based on Life Through a LOMO, pages 66-69 in the book 50 Photo Projects, by Lee Frost

Saturday, July 25, 2009

Four Quick Shots

Week 6

The Actionsampler is an inexpensive camera with 4 plastic lenses and a shutter mechanism that records pictures about 1/4 of a second apart on a standard frame of 35mm film. The camera is fixed focus, fixed aperture, and fixed shutter speed. Just point and push the button for four quick shots. The camera arranges the shots sequentially from upper left counter clockwise around to upper right.

To get this kind of shot with an SLR is easy but takes some post processing after the shot. Every shot should have the same exposure so I set my camera to manual ISO 200, aperture of f13, and shutter speed of 200. This is just one stop off the "sunny 16" rule and maybe I cheated a little because I used my meter and a test shot before shooting the series. I wanted depth of field and pretty fast shutter speed. Focal length is 16mm so very wide angle on full frame. It turns out the lag between shots I'd set for shooting speed when the shutter button is held down was 1/3 second instead of 1/4 second. It was late in the day - see the long shadows? - and the light was warm and dropping off a little. I cropped each frame to 8x10 after the shot. A D3 with a Nikkor 14-24 f2.8 makes for a pretty expensive Actionsampler but it does get the job done. Then it is just a matter of bringing all 4 pictures in as layers in Photoshop and pasting them in order.

When I made this series I was sitting on a bench waiting for trains to come by. I had done a couple of my patented "engineer style" shots where I held the camera perfectly level, nicely framed, nobody was in the shot, etc. Boring, boring, boring. So I came up with the idea of rotating the camera as I shot. Believe me, this type of creativity is difficult for an engineer. About that time the young lady came up and stood just in the frame. What luck! I like the way it is framed but there seems to be too much going on. See this shot in my blog for a more cropped and straightened version of the last frame: Apparently Random Travel Blog

I noticed after I had done this that it looked kind of cartoonish. You know, wacky angles and frames and what not. So I tried fooling around with the colors a bit in the shot below. I think the wide angle works well - might try a fisheye. You want the action coming at you I think but it would be worthwhile looking at it going away. I did something like this at Erica's wedding with the bouqet and garter toss sequences but at a right angle and with more frames. Kind of fun....

Idea based on Four Times More Fun, pages 42-43 in the book 50 Photo Projects, by Lee Frost
Cartoon or straight - which is better?


Saturday, July 18, 2009

Montage

Week 5

I'll bet you thought I'd never stop the black and white... but yes! Now it is green and white.

The idea here is that a collection of photographs can be more powerful than a single image. For my project I spent about 20 minutes on a walk from the house along the greenbelt in our neighborhood and photographed weeds, bushes, and trees that interested me with the preconceived notion of making a near monochromatic montage around the theme of leaves.

I fixed the aperture at 5.6 to reduce depth of field and let the camera choose shutter speed and ISO. Since it was late evening, most of the shutter speeds are 1/30 second and ISO is running 200 to 1000 or so. I might have chosen to shoot a little earlier and possibly get better light but this was guerilla photography and I was on a tight schedule. All shots were taken with a Nikon D3 (ISO 1000 is no problem) and a Nikkor 105 Macro VR so I could get close if wanted.

I've made montages before and posted them. See for example this one of cherry blossoms in Japan.

In all I took about 50 pictures. I selected the "best" and ran them through Photoshop to crop and get the resolution down. Cropping was random with respect to squares and rectangles - just whatever I thought might look good. On photos that were a bit "flat" I increased contrast and adjusted exposure with Levels. All processing was done on JPEGs.

Then I made a large blank canvas in Photoshop and sucked the pictures in as layers. I started in the middle and arranged the photos out roughly in a radial fashion in the same order I had imported them. The arrangement is supposed to look a bit like a leaf itself. I put a shadow under each photo and put a graduated green background behind it. There was too much yellow in some of the leaves to my eye (we have had a drought here) so I made a hue/saturation mask and reduced saturation in the yellows.

I gave it the very creative title of Suburban Leaves and stamped my name on it.

Idea based on Make a Montage, pages 72-73 in the book 50 Photo Projects, by Lee Frost

Monday, July 13, 2009

Toy Camera

Week 4

Inexpensive film cameras like the ultra low tech Chinese made Holga, about $35 new, are used by some for their sometimes unpredictable artistic effects. For my project I bought a $3.99 Winnie the Pooh camera at Walgreens that was pre-loaded with 35 mm 400 ASA color film.

The idea here is to free yourself from all the camera settings and expensive equipment. The Pooh has nothing to set at all. I have no idea what the aperture or shutter speed is. It is a pretty wide angle lens - I am guessing maybe 28mm or so. The lens is plastic, typical of this breed, and soft at best. At least the camera didn't leak light.

Anyway, out of a roll of 24 exposures (I actually had 27 when developed), this one was the best I thought. Click on it to enlarge and you can see how soft it is in corners. I didn't have to add vignette in Photoshop either.... I did convert it to black and white because I didn't care much for the color.

Just for fun, here I am shooting the Pooh on location at the Maroon Bells near Aspen, Colorado.

This is the shot from above with no Photoshop.

And here is a similar shot taken with a Nikon D3.

Idea based on Toy Story, pages 38-39 in the book 50 Photo Projects, by Lee Frost

Saturday, July 4, 2009

Shapes

Week 3

Once again I went back and forth on what to do this week. The photograph I finally selected was taken from the air as we flew back from Calgary. The flight path goes from Canada over the upper midwest of the United States and is spectacular in many areas.

I started by taking photographs of circular irrigation patterns but couldn't really make anything work. I ended up with this aerial of mountains and water but if you click on it and look in the top right hand corner you will see an irrigation circle.

What I like about it is the demonstration of chaos theory in the erosion of the mountains and the structure of the river (look up chaos theory if you don't believe me). These are shapes at their most sensuous and are present everywhere in nature. This shot of gardens in Papua New Guinea is another example of shapes from the air, although it is not cropped to accentuate the shapes.

The light comes from the early afternoon sun so the shadows aren't real long yet. I used my Nikon D3 with 70-300 mm VR Nikkor lens at 70mm, f5, ASA 800 in aperture priority to get a fast shutter speed of 1/2000. The airplane was at altitude, so maybe 30,000 feet. At this height you are shooting through a lot of atmosphere especially considering that it is not straight down. The moisture in air means it is blue and there is no contrast. I'm sticking with square and B&W this week for the format. I did everything I could think of to get contrast and used a green filter in the photoshop conversion.

Idea based on Shaping Up, pages 116-117 in the book 50 Photo Projects, by Lee Frost

Sunday, June 28, 2009

Circle Theme

Week 2

This is probably going to be harder than I thought.... I had a couple of ideas this week that I pursued and this was the best I could do. The reason I think it is going to be hard is that each week I'll have less and less to choose from.

I chose a theme (circles) and then went out to shoot it. The photographs were all taken today down on Stephen Avenue in Calgary. I went for black and white again this week because it is artsy and just seemed right. Lighting was all natural, late morning light.

I've used this concept before, see for example this grouping of flowers in Brisbane by clicking here.

The camera was a D3 hand held mostly in aperture preferred mode and wide open, 70-300 mm VR Nikkor lens at various focal lengths, ASA 200 or 400 set to get acceptable shutter speed. I was stuck with Elements 5.0 on my baby laptop to crop each circle to a square format, increase the contrast, and convert to black and white.

Idea based on Shoot a Theme, pages 118-119 in the book 50 Photo Projects, by Lee Frost

Saturday, June 20, 2009

Start a Photo Blog

Week 1

Today I was in Borders and noticed a book that I had not seen before and ended up buying - 50 Photo Projects by Lee Frost. I like his work and here is a link to his web site: http://www.leefrost.co.uk/

When I saw the title, I immediately had the idea for a project a week for a year (Mr. Frost needs to add 2 more projects when he updates the book) . There are a lot of people doing 365 photo projects where they take a shot a day for a year. I don't think this would work well for me. Firstly, I don't think I could get a good shot every day and I am looking to improve my quality. Secondly, I might be in a hurry just to get a shot and be adverse to trying something new because it might not turn out. Having a week to develop an idea gives time to try something new and perhaps maintain or improve the quality.

The rules for my one year project are:

1) the photo and project is to be taken between Monday and Sunday of the week (I'll give myself a little leeway on when I publish it though), 2) one of the projects in the book must be used as the starting point for the idea of the photo but it need not be exact, 3) the projects do not have to be in the same order as the book, 4) within 52 weeks I have to use all 50 of the ideas, 5) I'll come up with new ideas of my own for the remaining two weeks, and 6) I'll explain the idea and the technical background of the photo in the blog post as appropriate to document the learning experience.

The project for week 1 came from page 122 of the book and is simple: Start a Photo Blog, and that is what I have just done.

The picture for the week is an exercise in lighting and making a high quality head shot. Other than I started a blog with it, it isn't based on ideas from the book. The color version looked OK but black and white seemed better suited to a classical musician. Lighting information and technical data as follows:

SB600 main light camera right about 3 feet away and just above head high in a very small soft box @ half power


SB600 fill light light from camera left in feathered shoot through umbrella w/ half cover to prevent background spill @ qtr power about 5 feet away.


SB600 with blue gel on background @ half power. Background wall about 4 feet back.


SB800 on camera acting as controller only. All SB600s under manual control.
Nikon D3 105 mm f8 @ 1/60
Converted to black and white in photoshop with black and white adjustment layer and applied a light sepia tone. The sepia was masked out from his eyes and the shirt (jaundice and a stained shirt - not good).

Idea based on Start a Photo Blog, pages 122-123 in the book 50 Photo Projects, by Lee Frost