Week 11
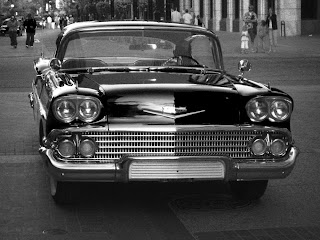
I enjoyed doing this one - looks like an old photograph doesn't it? This Chevy was stopped in the middle of the road on Stephens Avenue in Calgary just down from where we were about to go in and eat. I didn't know why he was stopped where he was but I liked the head on view so I walked down to where he was, stepped out in the road, and quickly composed and shot the picture.
But I am getting ahead of myself. The idea here is to try a digital point and shoot instead of your fancy SLR. I used a digital point and shoot for years before I got my first digital SLR and used to carry mine everywhere I went - that is the beauty of them. They are handy and they aren't near as conspicuous as a Nikon D3....
Of course the downsides are that they have shutter lag, don't do as well in low light (look at the noise in this photo), you can't swap lenses, most of them don't have as much artistic control, overall quality is lower at high enlargement, etc. Oh yeah though, I left out an important plus, they are way cheaper. Overall, in good light with subjects that aren't moving too much they do just fine and they also can be enlarged up to 5x7 and even 8x10 for prints.
Now, back to the picture. This guy wasn't moving because his car was broke down. I only figured that out because a wrecker pulled up and hauled him away. Nice car though....
The camera is a Canon IXY Digital 70 and it is a couple of years old now. I have owned a couple of Canon IXYs and they were all good - just don't drop them, especially with the lens extended. The camera was set on automatic and I don't know what the ISO speed or 35mm lens equivalent is. I know I composed by zooming in somewhat.
The light is late afternoon coming over my shoulder straight at the car and there are some fairly strong reflections as a result. The EXIF data says the camera chose f/4.9 and 1/125 of a second. The hood of the car is sharp, the background soft and grainy from the relatively low light. I like the composition and didn't crop it at all.
Post processing consisted of increasing contrast and applying a B&W adjustment layer in Photoshop with the infrared option selected. I usually use the B&W layer these day for B&W instead of other techniques and try the different filter options in it to get ideas before tweaking further. In this case, the infrared really darkens the car because it was cherry apple red to begin with (click here for the original photograph without any post). I put some vignette around it and that was that.
Idea based on Pocket Power, pages 86-87 in the book 50 Photo Projects, by Lee Frost
Sunday, August 30, 2009
Sunday, August 23, 2009
At a Loss for Inspiration
Week 10
This was a good week for quantity of photos posted in my travel blog but it was a struggle for One Photo a Week. But I ended up with this one that is interesting...
What do you do when the location is boring, the light is bad, it is raining, or all of the above. The things I tried weren't working but I spotted this bark and liked it. So I got close and blocked everything else out. Other things I try when the muse fails me include shooting in B&W (one of my favorites) and just looking harder and from different angles. When all else fails, go somewhere else :-).
The shot is of the bark of a tree located near the Bow River and I am around 2 feet (.6 M) away with nothing but bark in the frame. The light is late afternoon sun, the camera my D3 at ISO 200. The lens is a Nikkor 24-70 f2.8 at 70mm. The camera was in automatic mode and it selected an aperture of f7.1 and speed of 1/200 second.
There is very little post-processing in this picture other than cropping it square. I considered cloning out the partial splits at the edges of the frame but in the end just left them in.
Idea based on Desparate Measures, pages 30-31 in the book 50 Photo Projects, by Lee Frost
Monday, August 17, 2009
Panorama
Week 9
Panoramas are a great way to show wide horizontal scenes in my opinion and they sometimes work good on a vertical. Photoshop or similar software can be used to stitch together a series of pictures and I've used that technique successfully a number of times.
The advantage of that approach is you get great resolution and you don't need an ultra wide lens. The disadvantage is that if things are moving fast it might show, especially in the stitching. I always photograph in Manual with fixed iso, fixed speed, fixed focus, and fixed aperture so that the blending is smoother when I use this technique. It also helps to put your camera on a tripod but I've done OK handheld.
My D3 can make reasonable 20 to 30 inch wide frames though if you don't stand too close without stitching and that is what I've done here. The scene is an old grain silo in the Badlands east of Calgary near the town of Drumheller. I'll post some more pictures of the area in my other blog, Apparently Random Travel Blog. Anyway, when I took the shot I thought it might make a good panorama.
The lighting is coming from the late afternoon sun on the left. The cliffs in the background were dark from shadow so I lightened them up a bit in Photoshop. I bumped up contrast on the grain silo to show the texture and writing on the side better. I also put a slight vignette around the edges to draw the eye to the center.
The camera is a Nikon D3 at ISO 200 and 1/400 sec, lens is a Nikkor 24-70 f2.8 (my new present to myself) at f10 and 24mm.
Idea based on Stretch Your Imagination, pages 128-131 in the book 50 Photo Projects, by Lee Frost
Sunday, August 9, 2009
H20
Week 8
This week is about water. I've pointed my camera at it lot of times - rivers, boats, waterfalls, reflections, rain.... But there had to be a way to photograph water in a way I hadn't tried before.
This is a rock in the Bow River downstream of the spillway on the lagoon that forms Prince Island in the Eau Claire district in Calgary. I am standing above the rock on other rocks shooting more or less straight down from 2 feet or so as the water rushes by. Click on it and have a closer look at the strings of light in the water. I'm not sure what caused that but for me it is the best part of the picture and although this one doesn't grab attention right away I like the abstract quality.
I wanted to smooth out the water with a slow shutter speed. I didn't have a polarizer or neutral density filter so I just set the aperture as small as I could and the ISO as slow as I could. The camera is a D3 at ISO 100 (L1.0) and the lens is a Nikkor 50mm f1.8 set at f22. Exposure time was 1/10 of a second. Post processing in Photoshop consisted of darkening and increasing the contrast with curves.
Idea based on Just Add Water, pages 56-59 in the book 50 Photo Projects, by Lee Frost
Saturday, August 1, 2009
Agfa Optima Societe
Week 7
This is what passes for a sidewalk cafe in Kingwood, Texas. Actually, it is a nice place and I like the breakfast and coffee. I just don't care much for 38 degrees C Texas heat. The view of Kingwood Drive and the parking lot isn't that great either but c'est la vie. Anyway, this table and chair outside caught my eye and I kind of liked the lines and shapes.
The Lomo LC-A is a somewhat low tech Russian camera with a sharp lens but no real creative control settings other than zone focus. Exposure is set automatically. A society, called the Lomograph Society, was formed to take advantage of this freedom in a creative way (and maybe make a buck). They market a new version of the Lomo and some other inexpensive cameras including the Holga.
Well, I am a radical and I refuse to participate in this mainstream "art" of the masses. I am forming my own society and calling it a societe because it sounds more high brow. The societe is based on the original 35mm point and shoot camera with automatic exposure control, the German made Agfa Optima. As best I can tell the model Ia that I have came out about 1962.
What would you expect to pay for this camera? I paid $6.01 in an Ebay auction plus $5.50 for shipping. It still looks good after all these years, including the leather case, and everything works except the leaf shutter sticks open from time to time, and that is not a good thing. I made it through this roll without a mishap though. It has a self timer, fixed aperture at 1/30 shutter for flash, and Bulb. I even tried it with my Nikon SB-800 speedlight setting flash duration in the hot shoe and that worked. There is a picture of me stylin' with this camera here.
The picture was taken outdoors in early morning with Kodak Gold 200 film in automatic mode. The zone exposure was set at "two heads" on the dial or 2 meters. I have no idea what the exposure was since it was in automatic and doesn't show any information other than a red dot that turns green as you depress the "magic release lever" and hold it for "approximately 1 second" thereby letting you know it has enough light. Actually, it has surprised me with how well it works. For this shot I cropped in Photoshop, turned it B&W with a blue filter if I remember correctly in a layer, and upped the contrast with Curves.
Idea based on Life Through a LOMO, pages 66-69 in the book 50 Photo Projects, by Lee Frost
Subscribe to:
Posts (Atom)